
Search result


Some users were complaining about Google Chrome (desktop version) performance issues and high RAM usage. Well, Google is working on an update that make the Chrome browsing experience get a lot better and far less annoying thanks to these two new features that are coming soon!
The first is deferred playback of autoplay media for background tabs. Right now, if you open a tab in the background that has autoplay media, it will start playing in the background when the page finishes loading, and you then have to hunt for the tab and silence whatever is playing. With this feature, Chrome will wait until the tab is in the foreground to start playing autoplay media, thus causing less annoyance and also using fewer resources for background tabs.
The second feature is where Chrome will automatically pause Flash ads and other non-essential Flash content on the page. Soon, Flash ads will have a gray box asking the user explicit permission to play them. Google advises ad partners to switch to using HTML5 ads, as they use fewer resources to run than Flash content.

Yesterday, HTC released a new device called HTC Desire Eye. This is the first Smartphone with an HTC Eye 13MP front-facing camera and flash for amazing selfies, the Desire Eye also packs a 13MP rear-camera with flash too.
Both cameras can record 1080p@30fps video. The one on the back has an f/2.0 aperture and a 28mm lens, while the one on the front has a wider 20mm lens but a smaller f/2.2 aperture.

HTC's trademark BoomSound speakers are harder to see but still on board. They flank the larger 5.2" screen of the HTC Desire Eye, an LCD with 1080p resolution. Besides selfie camera and screen size, the Eye also trumps the One E8 with an IPX7 rating water resistance up to 1m of water for half an hour.

The Desire Eye carries much better specs than most of the Desire family. It's powered by a Snapdragon 801 chipset with 2GB RAM and runs Android 4.4 with the latest Sense software and two camera-centric apps Eye Experience and the new Zoe.
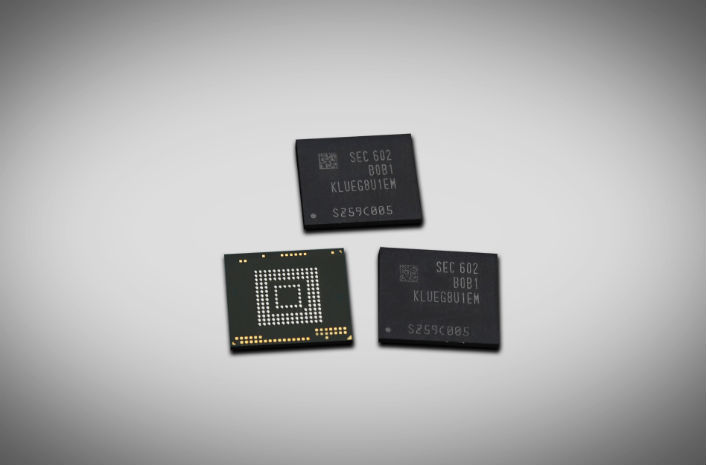
Samsung is gearing up to mass produce the first ever 256GB embedded memory module as a Universal Flash Storage 2.0. Performance is a big advancement over the recent SATA-based solid-state-drives used in high-end PCs.
The UFS memory from Samsung offers ultra-fast speed storage based around their V-NAND flash memory chips. The UFS memory is capable of performing 45,000 input operations and 40,000 output operations each second. The UFS memory is twice the speed of the previous UFS memory type. The latest version uses dual lanes of data transfer to create speeds of 850MB/s which is approximately twice the speed of SATA-based SSDs. For sequential writing, the speed is lower at 260MB/s.
One of the main benefits of the latest version of 256GB UFS memory is that it will better support playback of 4K video content. Tablets now have split screen display technology with 4K video playback that can be combined with a second area of the screen being used to display an app. This tends to push the hardware to the limit. With 4K video, the data read needs to be faster because a 4K video contains so much more compressed image and audio data. This audio/visual data needs to be read, decompressed and played in real-time.
Samsung has just gone into full production of their UFS memory 2.0 chips which will become available later in 2016.

If you want to get the latest firmware updates on your Samsung Android device, you'll have to Flash the ROM manually. The best way to do this is using Odin 3 tool and in this Tutorial we will show you the safest way on How to flash a firmware update to your Samsung's Android device.

BEFORE YOU START!
- Fully recharge your Samsung device battery before engaging into flashing process.
- Prepare a Windows base OS computer or laptop, Odin flasher tool will not run on Mac and other OSX systems.
- Use the supplied USB data cable, a bad USB data cable caused a flashing errors. Believe me, I've faced it several times, if you get failed errors in Odin then you did not read this.
- Remove the external micro SD card if you have one, to avoid any failures and error during the flashing process. (Recommended for beginners, some rouge 3rd-party apps stored on SD card may also caused some problem)
- Closed any other running programs in your computer, this include Samsung's Kies too which basically blocks you from using Odin.
DOWNLOAD TOOLS:

- Download Odin v3.10 from HERE
- Download Latest Samsung KIES + USB Drivers from HERE
- Download Samsung USB Drivers ONLY from HERE
- Download Official Firmware for your device from YouFirmware
STEP 1: Run and configure Odin3 v3.10

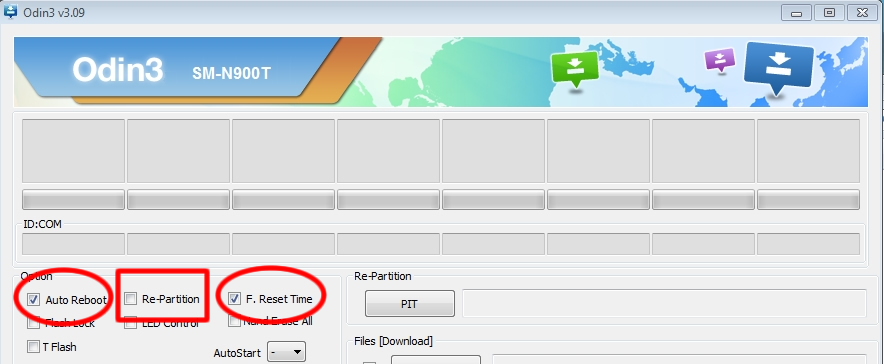
Hover your mouse to these three Odin check-boxes options, by default the "Auto Reboot" and "F. Reset Time" check-boxes are marked Checked. Just ensure the "Re-Partition" remains NOT-Checked.
Step 2: Boot your Device into Download Mode

Turn your Samsung device off, then Press the [Volume Down+Home+Power] buttons all together at the same time, HOLD them, then let them go until a warning screen prompted you to choose continue or cancel. Then Press the [Volume Up] button to continue and you will see a download mode screen on your device like in the photo above.
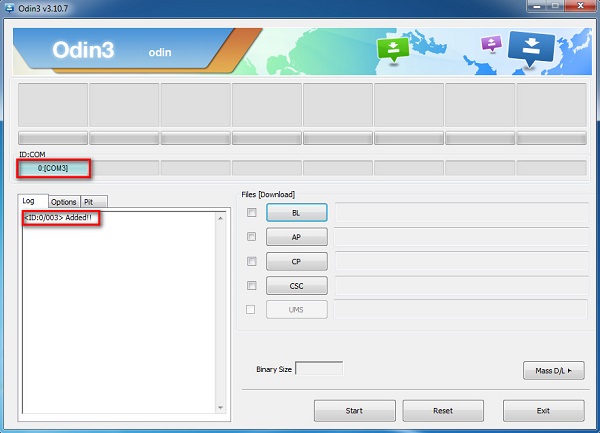
Step 3: Connect your Samsung device to the computer via the USB data cable

Once you connect your Samsung device with the USB cable you can see that Odin's ID:COM triangular bar turned to blueish color and shows you the USB port number of your Samsung device is using for connecting with your computer. The COM number will depend on which USB port assigned with your phones, it usually connects from 01 to 07. There is also a word that says "Added" in the log-cat box. If you ain't see any response, try to recheck the USB cable and re-install the USB Drivers.
Step 4: Load the Firmware into Odin
Click the Odin "AP button" then browse and select the firmwares file. Just make sure you already unzipped it and then browse to the folder where you downloaded your firmware, it should end with file description as "tar.md5".
For Example, if you are about to flash a Samsung Galaxy S5 SM-G900F, the firmware should look something like this "G900FXXU1ANE2_G900FOXA1ANE2_HOME.tar.md5". Note that Firmware packages comes in different build version numbers and basically shows the device model number such "N900F" or "N925A" and so on.
After that, wait 1-10 seconds while it reads the MD5 checksum.
Step 5: Install the Firmware into your Device
Simply hit the "Start Button" Once both AP and CSC files filled with the right files, simply click that Odin's "START" button to begin flashing. Wait and watch the progress bar as it will show you the exact time how it completes the flashing and it takes a couple of minutes before the flashing finishes, you have a time to relax for a while.
Step 6: Wait until the Restoration Process completes!
When original firmware installation successfully completed, you'll noticed that Odin displays a word "PASS" in Green. This means the operation was a success. Then reboot your phone and you are done. Check the Notes below if you have any problems.
Important Notes:
• If you flashed a firmware and faced issues with your Wi-Fi connection, Make sure that "auto reboot" option in Odin3 is NOT checked (Step1) and wait until Odin says "PASS" (green text at the bottom right) then disconnect your device.
• Samsung KIES installation is required to get the Samsung USB driver, In case you don't want to install KIES OR you already have it but facing many issues with it on your syste... just install the Samsung USB drivers only from the links above.


The popular third-party Dolphin Browser has been updated to support Android 5.0 Lollipop. The browser now supports Flash and the whole browsing experience has been enhanced with the update.
It might be a day late, but the update also includes some Christmas themed wallpaper. An interesting new feature automatically clears app storage when there is not enough native storage to run the browser.

Here's a brief list of those new features and changes made into Dolphin Browser:
- Flash support and enhanced browsing experience on Android 5.0.
- Merry Christmas! Check out gorgeous Christmas wallpapers in Theme.
- Auto-clear app storage when device storage is not enough.
- Sync speed dials, add-ons, themes, settings and more via Dolphin Connect,
- Share pages between devices using NFC.
Another new feature will allow you to share content with other smartphone users via an NFC connection. Using Dolphin Connect, you will be able to sync speed dials, add-ons, themes, settings and more. And while you are checking out a website, the bottom-bar will disappear giving you a full screen view of the site. Try the App from the link below!


SanDisk is now offering a new 128GB iXpand Flash Drive. When used with the new iPhone 6, iPhone 6 Plus, iPad Air 2 or iPad mini 3 128GB models, the new iXpand Flash Drive instantly doubles the available storage for photos and videos, music, and other multimedia files.
The flash drive is encrypted and can be unlocked with the users's fingerprint, Apple Touch ID. The well-rated and full-featured iXpand Sync app, available on the App Store for iPhone and iPad allows users to automatically sync, backup and transfer photos and videos.

SanDisk also said the iXpand Sync app has added support for Apple's Touch ID sensor for iOS 8 that will allow owners of the iPhone 6, iPhone 6 Plus, iPhone 5s, iPad Air 2 and iPad mini 3 to open, encrypt and decrypt apps and files on the iXpand Flash Drive with just their fingerprint. The 128GB version of the iXpand Flash Drive is on sale now for $149.99.

We are still waiting for Samsung's Galaxy S5 Android 5.0 Lollipop update that is coming later next Month. Well, you can try it now on your S5. Sprint's Galaxy S5 Lollipop ROM has been leaked and you can download it now and flash it to your Galaxy S5.

The leaked ROM is a preliminary version (about 1.3GB in size) but it can do basic functionality, including calling and texting. Note that installing this will wipe all data stored in the phone, so make a fresh backup before you install the new ROM. You'll need Odin (3.04 through 3.07) to flash the ROM, it has been rooted with Chainfire.

If you want to download this leaked Galaxy S5 Lollipop ROM, Head to the XDA thread for download and steps on how to flash it on your S5.

Samsung developed Odin as a utility software to be used for flashing custom recovery firmware images onto any Samsung device that's powered by Android. In the course of this article, you will learn how to use it safely to manually install the various custom ROM firmwares, updates and kernels available for your smartphone.
What you will need
1. A Windows PC
2. Your smartphone/tablet
3. A USB cable to connect the device to your Windows PC
Preparations before you begin
1. Back up all important data that's currently on your smartphone as you might lose them during this process.
2. Install the latest Samsung USB drivers onto your PC. You can download and install Samsung Kies, which will do it automatically for you, but feel free to download and install them manually if you so choose.
3. Keep USB Debugging enabled on your Samsung device.
4. Charge the battery of your device to a minimum of 80%.
5. Once you have installed the latest USB drivers, make sure that you exit Kies before proceeding further as it's known to interfere with Odin at times.
6. Download and unzip the custom ROM or the official firmware which you want to flash onto your Samsung device. Make sure that your device's model number and the model number of the firmware match perfectly or you will run the risk of bricking your device.
Downloading, installing and running Odin
1. Download the latest version of Odin.
2. It will be in a .zip file format, so you will need to extract it.
3. Go into the extracted file folder and right click on the Odin3 v3.x.exe file ("x" represents the version of the software which will vary depending on which version you downloaded) and left click on "run as administrator."
4. Odin will now start and on the very first screen, make sure that the only two options checked are "Auto Reboot" and "F. Reset Time."
Installing the firmware
1. Switch off your Samsung device.
2. Hold down on the Power button, Home button and the Volume Down button at the same time.
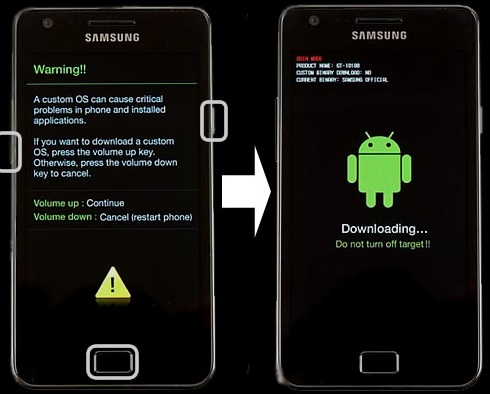
3. When you see the warning screen, complete with a yellow triangle that has an exclamation mark inside, let go of the three buttons and press only the Volume Up button to enter Download Mode.
4. Now connect your device to your PC via USB and wait until you see a box just under the "ID:COM" tab light up in blue (the color may vary depending on your version of Odin). The number you see in the box is the USB port number which your phone/tablet is using to connect to the PC. You may also see a new "Added" message in the bottom left panel.
5. Left click on "AP" or "PDA" and browse the folder where you had previously unzipped the firmware package to find the firmware file which should have tar.md5 at the end of its name.
6. Once Odin has loaded up the file, click on "Start" to begin the process.

7. Wait until the process finishes and you see a green "Pass" button indicating that you have managed to successfully flash the custom ROM onto your device.
What if the update package contains more than just one file (tar.md5)?
In that case, you will need to simply add a few extra steps to the process after step 4 and in place of step 5. After that, just follow the instructions from step 6 and step 7 to complete the process.
1. Click on "AP" or "PDA" and select the file with the term "PDA" in its name.
2. Click on "CSC" and select the file with the term "CSC" in its name.
3. Click on CP and select the file with the term "modem" in its name.
*All files will be in the folder where you unzipped the downloaded firmware package.
**In case any of the files are not in the package, you don't need to worry as it means that the missing file is not necessary for the flashing process.
Saikat Kar (tech-enthusiast)

Our Mission is Keeping you updated with Latest Android News and Updates as it Happens!

© 2023 YouMobile Inc. All rights reserved