
How to flash Android firmware manually onto your Samsung device with Odin3


How to flash Android firmware manually onto your Samsung device with Odin3

Samsung developed Odin as a utility software to be used for flashing custom recovery firmware images onto any Samsung device that's powered by Android. In the course of this article, you will learn how to use it safely to manually install the various custom ROM firmwares, updates and kernels available for your smartphone.
What you will need
1. A Windows PC
2. Your smartphone/tablet
3. A USB cable to connect the device to your Windows PC
Preparations before you begin
1. Back up all important data that's currently on your smartphone as you might lose them during this process.
2. Install the latest Samsung USB drivers onto your PC. You can download and install Samsung Kies, which will do it automatically for you, but feel free to download and install them manually if you so choose.
3. Keep USB Debugging enabled on your Samsung device.
4. Charge the battery of your device to a minimum of 80%.
5. Once you have installed the latest USB drivers, make sure that you exit Kies before proceeding further as it's known to interfere with Odin at times.
6. Download and unzip the custom ROM or the official firmware which you want to flash onto your Samsung device. Make sure that your device's model number and the model number of the firmware match perfectly or you will run the risk of bricking your device.
Downloading, installing and running Odin
1. Download the latest version of Odin.
2. It will be in a .zip file format, so you will need to extract it.
3. Go into the extracted file folder and right click on the Odin3 v3.x.exe file ("x" represents the version of the software which will vary depending on which version you downloaded) and left click on "run as administrator."
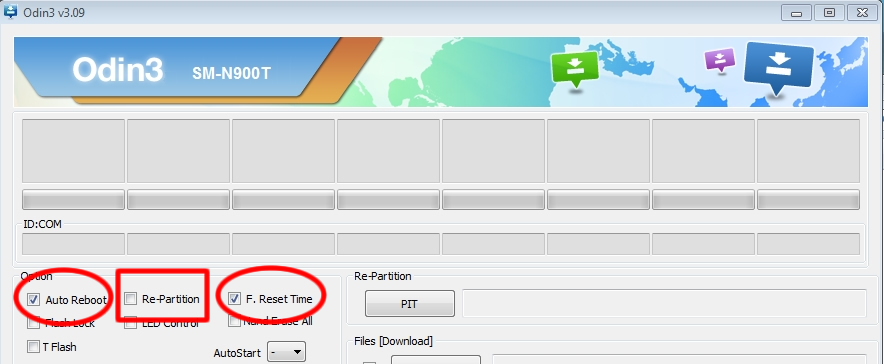
4. Odin will now start and on the very first screen, make sure that the only two options checked are "Auto Reboot" and "F. Reset Time."
Installing the firmware
1. Switch off your Samsung device.
2. Hold down on the Power button, Home button and the Volume Down button at the same time.
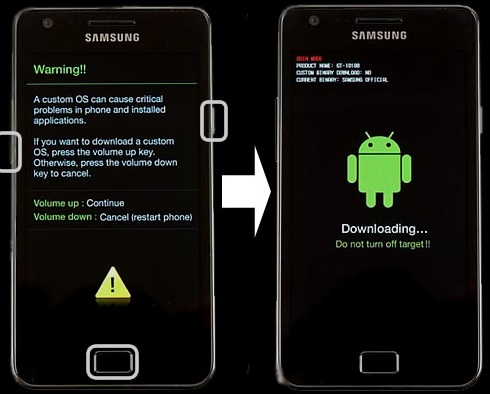
3. When you see the warning screen, complete with a yellow triangle that has an exclamation mark inside, let go of the three buttons and press only the Volume Up button to enter Download Mode.
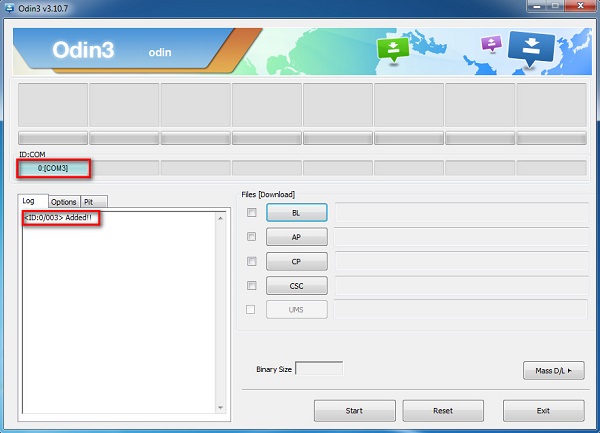
4. Now connect your device to your PC via USB and wait until you see a box just under the "ID:COM" tab light up in blue (the color may vary depending on your version of Odin). The number you see in the box is the USB port number which your phone/tablet is using to connect to the PC. You may also see a new "Added" message in the bottom left panel.
5. Left click on "AP" or "PDA" and browse the folder where you had previously unzipped the firmware package to find the firmware file which should have tar.md5 at the end of its name.
6. Once Odin has loaded up the file, click on "Start" to begin the process.

7. Wait until the process finishes and you see a green "Pass" button indicating that you have managed to successfully flash the custom ROM onto your device.
What if the update package contains more than just one file (tar.md5)?
In that case, you will need to simply add a few extra steps to the process after step 4 and in place of step 5. After that, just follow the instructions from step 6 and step 7 to complete the process.
1. Click on "AP" or "PDA" and select the file with the term "PDA" in its name.
2. Click on "CSC" and select the file with the term "CSC" in its name.
3. Click on CP and select the file with the term "modem" in its name.
*All files will be in the folder where you unzipped the downloaded firmware package.
**In case any of the files are not in the package, you don't need to worry as it means that the missing file is not necessary for the flashing process.
Saikat Kar (tech-enthusiast)

Our Mission is Keeping you updated with Latest Android News and Updates as it Happens!

© 2023 YouMobile Inc. All rights reserved