


Hidden menus and codes on cell phones are anything but new. Back in the days, even the old-school brick phones had these, allowing people who knew about them to access service options and software information. Today, a "secret" menu exists on most popular smartphones, and to get to it, you just need to input the right code.
What code, you ask? Well, you've probably heard of *#06# which you type in your dialer, as if you were about to "call" it. When this particular code is entered, and it should work on any cell phone, the device's identity number (IMEI) is displayed. A smartphone's hidden menu can be accessed with a code that looks pretty similar to this one.
Hidden Menus on Android
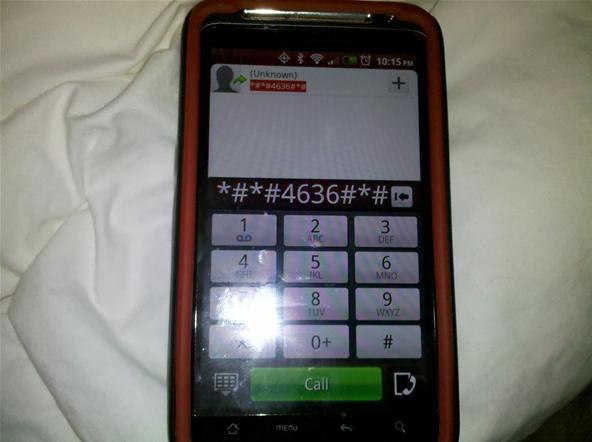
Hidden menus and codes on Android phones may differ, depending on the device's model. This way should work on most smartphones, Type *#*#4636#*#* (or *#*#INFO#*#*) in the dialer. It takes the user to a testing menu where network information is displayed, along with details on battery status and app activity.

Be warned: don't change anything and don't press any buttons in this menu unless you know what they do! On a side note, this particular menu was used to "enable" 4G LTE in Canada on the Nexus 4.


Taking a screenshot on the HTC One M8 is very easy. We will show you these 2 methods and you choose what's bet for you. The first one using one of the M8's software keys and the other method using only hardware keys.
Method No.1 - Hold Down the Power Button & Volume Down Button.

Hold the power power button and volume down button at the exact same time. This method is the most common method on Android and is used for most of the most popular Android phones. It might take a little practice and you may just see your volume going down, no problem, try again and try to press the buttons at the exact same time. You can find your screenshot in the notification and in your gallery.
Recommended!
Method No.2 - Hold the Power button & tap the software home button.
The 2nd method might be easier for you to perform, it's quite simple, you hold down the power button for a couple seconds and then you press the home button. Make sure you don't hold down the Power button for too long, or else you will see the Power dialog. Notice that your screenshot will have a slightly grey "click" animation below on the software home key which may ruin it.
The difference of the 2nd method from the 1st method is that it has a different flash animation and a slightly different shutter tone. Also, a message indicating a successful screenshot will appear at the bottom of the screen. This 2nd method, doesn't allow you to view your new screenshot on the notification menu. You will have to view your screenshot directly in the Screenshot album in the Gallery app.

In this Guide we will show you How to Root your Samsung Galaxy S4 GT-I9500 running Android 4.4.2 KitKat based firmware [I9500XXUFNC1]. NOTE: Remember to follow the steps carefully, rooting voids your warranty continue at your own risk.
Requirements
- Galaxy S4 GT-I9500 running firmware I9500XXUFNC1 (only the international variant is supported for this Root).
- Chainfire's CF-Auto-Root package with SuperSU fix Download here
- Samsung Kies Android USB drivers installed and properly configured.
- USB Debugging mode enabled on the phone (Setting -> Developer options)
- Odin 3.07 flashing software configured and working Download Here
- Backup your data completely (Contacts, Music, Videos... etc).
- At least 80% battery remaining on the device.
Step 1
Download both the Chainfire Auto-Root package and Odin3 from the links in the Requirements section above, and extract them to a convenient location on your PC to be easily accessible.
Step 2

Put your Galaxy S4 into Download mode. This can be done by powering down the device, and then turning it back ON by pressing and holding the Volume down key + Power key. Follow on-screen instructions to achieve Download mode.
Step 3

Fire up Odin3 on your PC and connect your phone in Download mode (Step 2) via USB cable. Let Odin do its configurations automatically if it's the first run when device is properly connected, one of the COM boxes on top will turn Yellow along with it containing a COM Port number [ex: COM6].
Step 4
In Odin, click on "PDA" and select the CF Auto-Root file that you download in (Step 1). Also check that "Auto Reboot" and "F. Reset Time" are CHECKED in Odin, whilst leaving all other settings as they are.
Step 5
After completing (Step 4), Hit the "Start" button. The process should take hardly a minute after which your device will automatically boot into recovery and set the SuperSU binaries in place. You'll get a Big GREEN Pass on Odin. once your phone powers back normally, you will have root access.


Here's the Top 10 most Handy Tips & Tricks of the HTC One M8. Make a use of your new HTC Smartphone capabilities.

1- Customize Quick Settings to suit your needs
The Quick Settings menu is packed with handy shortcuts, but you may find that some are less useful than others. Fear not, as you can mess about with the order of the settings by tapping the Pen and Paper icon in the top-right corner of the screen. Using this method, you can push up the more important toggles to the top of the Quick Settings menu.
2- Enable faster typing
Trace-to-type has been available on Android for ages thanks to the availability of the Swype keyboards, but many handset makers are now baking it into the firmware and HTC is no exception. When the keyboard is open, long-press the key with the "cog" icon to access the keyboard settings menu. Make sure "Trace keyboard" is ticked and you're away.
3- Make your phone even faster by enabling ART runtime

With Developer Mode enabled you can switch on the experimental ART runtime. Android currently uses Dalvik Runtime, but Google is going to move over to ART in a future update. ART is a "Ahead of time" compiler, and should make your phone feel faster. You can always revert back to Dalvik if you don't find it to your liking, but we think that the difference is genuinely noticeable.
4- Control your TV, AC, Home theater wit your M8
The HTC One M8 boasts an IR blaster, which means you can use it as a conventional remote control to change channels, toggle the volume and generally perform other tasks. You'll need to tell the phone which brand of TV, AC, BD, DVD... etc that you own for it to work properly, but once you've done this you'll never have to fumble around the living room for your remote ever again. You'll find this feature in the TV app.
5- Hide annoying and bloatware applications
HTC has done a decent job of keeping bloatware applications to a minimum on the One M8, but you may still find yourself wanting to get rid of some of the more annoying programs in your app drawer. Bloatware is so named because it cannot be uninstalled, but you can still hide it from view.
In the app drawer, tap the three dot icon in the top-right corner of the display and then select "Hide/Unhide" apps. Tick the ones you want to remove from view and you'll be on your way to a less cluttered phone.
6- Answer a call just by picking the phone up
There's nothing more natural than scooping up a phone and answering it in one motion, and the HTC One M8 allows you to do just that. Using the proximity sensors located near the top of the device, the handset can tell when you've placed it next to your ear and will automatically answer the call.
7- Use gestures to control your phone quickly and easily
The HTC One M8 is all about gestures, and it comes with a series of quick swipe gestures branded "Motion Launch" by HTC which can be used to open certain applications even when your phone's display is powered down and it's sitting on your coffee table.
A double-tap wakes or locks the phone, while swipes from the left and right open BlinkFeed or your home screen respectively. You can wake the phone in the state it was when it locked by swiping up from the bottom of the screen, and swiping downwards fires up the dialer so you can make a call quickly.
8- Disable BlinkFeed
BlinkFeed is HTC's way of aggregating everything that is important to you, including RSS feeds, social networking updates, forthcoming calendar appointments and more. It's a pretty swell application, but Android purists often complain that it feels like it's being forced upon them. If you don't like it then you'll be pleased to know that there's a way to disable it completely.
On any homescreen, simply perform a "pinch zoom" gesture with two fingers. You'll see an overview of all your homescreens, with BlinkFeed appearing on the far left. Long-press BlinkFeed and then drag it to the "remove" icon, it will be banished forever, or at least until you decide that you want to reinstate it.
9- Create an animated GIF from a Zoe clip
HTC's Zoe shooting mode complies a video from a set of images, and is a great way to share precious moments with others. It's even easier to exchange these memories thanks to the option to transform a segment of a Zoe clip into an animated GIF file, which can be viewed on most phones, tablets and computers. Simply select the Zoe clip, tap "Edit" and then select "GIF Creator".
10- Show your battery level as a percentage
By default, the HTC One M8 displays your current battery stamina as an icon rather than a percentage, which gives a quick visual indication of how much juice remains in the tank but isn't entirely precise. Thankfully, you can display a percentage by going to Settings > Power > Show Battery Level.

This Root Guide has been tested only on the Moto X that is running on stock official Android 4.2.2 KitKat Firmware. Therefore, the steps from below are compatible only with the mentioned Android based device, always Back-up all your data. NOTE: Rooting your Moto X will void your warranty.
Step 1 - First of all, on your computer you need to Download the Android SDK.
Step 2 - You'll need Cydia Impactor file Download HERE, and the latest version of Slap My Moto Download HERE.
Step 3 - Now, connect your Moto X with your computer via USB cable.
Step 4 - On your computer open a command prompt window go to "start -> run -> type cmd".
Step 5 - On the cmd window type the following command: "adb push SlapMyMoto.jar /sdcard/SlapMyMoto.jar".
Step 6 - Also, on the same cmd window enter "adb shell getprop dhcp.wlan0.ipaddress" (the ip address of your phone will be displayed).
Step 7 - Good, now from your computer open the Cydia Impactor program and select the "# start telnetd as system on port 2222" option. Then Click on start.
Step 8 - Return to the cmd window and enter the following commands (replace IPADDRESS with your phone's own IP address that has been provided before): "telnet IPADDRESS 2222; dalvikvm -cp /sdcard/SlapMyMoto.jar SlapMyMoto".
Step 9 - When the system will prompt you to reboot your phone, in cmd enter "adb reboot".
Step 10 - Now reboot your handset in bootloader mode by typing in cmd "adb reboot bootloader".

Step 11 - Once your Moto X has been entered the bootloader mode, on the cmd window you need to enter: "fastboot flash partition gpt.bin"; "fastboot flash motoboot motoboot.img"; "fastboot flash logo logo.bin"; "fastboot reboot".
Step 12 - Up next, your handset will reboot; then you will have to type the command (again on the same cmd window): "adb push su /data/local/tmp/su"; "adb push install.sh /data/local/tmp/install.sh"; "adb push rec.sh /data/local/tmp/rec.sh"; "adb push install-recovery.sh /data/local/tmp/install-recovery.sh"; "adb push setup.sh /data/local/tmp/setup.sh"; "adb reboot".
Step 13 - Once your phone reboots type in cmd: "adb shell; echo /data/local/tmp/rec.sh > /sys/kernel/uevent_helper".
Step 14 - In the end you will just have to go to Google Play for installing the Super SU app.
Step 15 - NOTE THAT: if during the process from above your Moto X gets stuck on a boot loop (Don't panic), you will have to restart your handset and repeat the root operation from (Step 1). Check this XDA Forums Topic for More Help.
Your Moto X is Rooted!

Our Mission is Keeping you updated with Latest Android News and Updates as it Happens!

© 2023 YouMobile Inc. All rights reserved