


In this Root Guide we will show you How to Root your LG G2 phone with very easy simple step, with screenshots to make it easy for you to keep up. NOTE: Rooting your device will void your warranty may brick your device so continue at your own risk.
STEP 1 - Download the LG USB Drivers From HERE and install them on your computer.

STEP 2 - Navigate to System Settings > General > About Phone > Software Information on the phone.

STEP 3 - Keep tapping Build Number until it tells you "You Are Now a Developer".

STEP 4 - Enable USB Debugging under developer options. You can get to developer options under System Settings > General > Developer Options.

STEP 5 - Plug in the device via USB and let the drivers install.

STEP 6 - Download the rooting tool from the developer's page HERE in the first post. Then, Extract all files from the zip to a folder on your hard drive.

STEP 7 - Double click the root.bat file and follow the prompts in the program.

STEP 8 - Unplug the phone from the computer when prompted.

STEP 9 - Toggle USB Debugging off and on and then plug the device back in.
STEP 10 - Hit "Enter" on the computer and wait for the program to finish rooting the device.

You should now see Superuser in your app drawer if all went to plan. and you're DONE!


Sony Xperia Z2 didn't go on sale yet, but developers already found a way to Root the Smartphone and we will show you How on this Article. The rooting process for the Xperia Z2 requires you to unlock its bootloader before being able to flash the Kernel and install SuperSU to gain the Root access. The device has also received ClockworkMod based recovery, which has been built from CWM 6.0.4.6 sources. NOTE: This will void your warranty and may brick your device.
STEP 1 (UNLOCK BOOTLOADER)
First step is to Unlock your Z2 Bootloader, you have to go to this XDA forum thread and follow the steps (same steps as Xperia Z1 are used for Xperia Z2).
STEP 2 (CWM-Based Recovery)
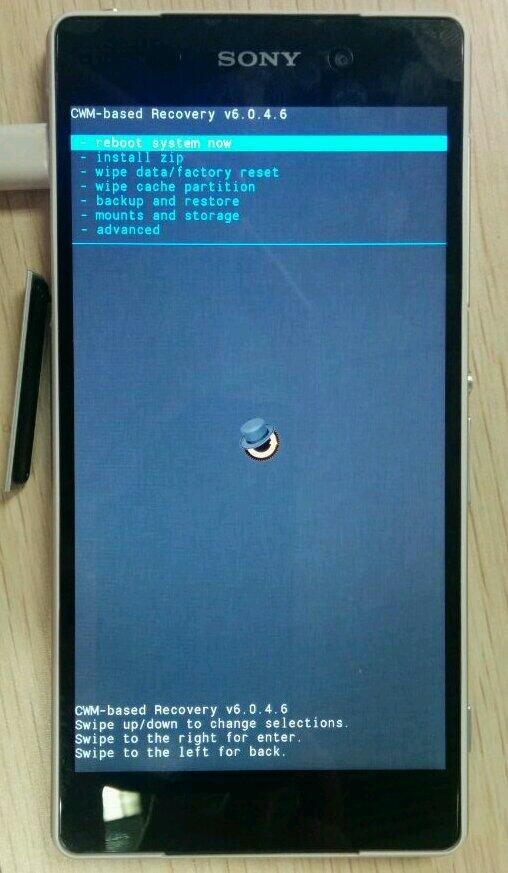
After Unlocking your Bootloader (Step 1), Now flash the rooting kernel and CWM-Based Recovery, head to this XDA Forum thread and follow the steps to flash the kernel and boot to enter recovery mode.
Xperia Z2 CWM Recovery [Guide Here]
STEP 3

After completing (Step 1) and (Step 2). Let's start Rooting. Download UPDATE-SuperSU-v1.94.zip from this LINK HERE into your computer.
STEP 4
Copy your downloaded "UPDATE-SuperSU-v1.94.zip" to your Xperia Z2 sdcard.
STEP 5
Reboot into Recovery. Check (Step 2) to know How.
STEP 6
Flash the "UPDATE-SuperSU-v1.94.zip" from the Recovery mode.
STEP 7
Reboot your Xperia Z2 from recovery into the OS, and you're DONE!

The Samsung Galaxy S4 GT-I9505 was just recently updated to Android 4.4.2 KitKat, in this Guide we will show you How to Root your Galaxy S4 GT-I9505 running Android 4.4.2 KitKat based firmware [I9505XXUFNA1]. NOTE: Remember to follow the steps carefully, rooting voids your warranty continue at your own risk.
Requirements
- Galaxy S4 GT-I9505 running firmware I9505XXUFNA1 (only the international variant is supported for the Root).
- Chainfire's CF-Auto-Root package with SuperSU fix Download here
- Samsung Kies Android USB drivers installed and properly configured.
- USB Debugging mode enabled on the phone (Setting -> Developer options)
- Odin3 flashing software configured and working Download Here
- Backup your data completely (Contacts, Music, Videos... etc).
- At least 80% battery remaining on the device.
Step 1
Download both the Chainfire Auto-Root package and Odin3 from the links in the Requirements section above, and extract them to a convenient location on your PC to be easily accessible.
Step 2

Put your Galaxy S4 into Download mode. This can be done by powering down the device, and then turning it back ON by pressing and holding the Volume down key + Power key. Follow on-screen instructions to achieve Download mode.
Step 3

Fire up Odin3 on your PC and connect your phone in Download mode (Step 2) via USB cable. Let Odin do its configurations automatically if it's the first run when device is properly connected, one of the COM boxes on top will turn Yellow along with it containing a COM Port number [ex: COM6].
Step 4
In Odin, click on "PDA" and select the CF Auto-Root file that you download in (Step 1). Also check that "Auto Reboot" and "F. Reset Time" are CHECKED in Odin, whilst leaving all other settings as they are.
Step 5
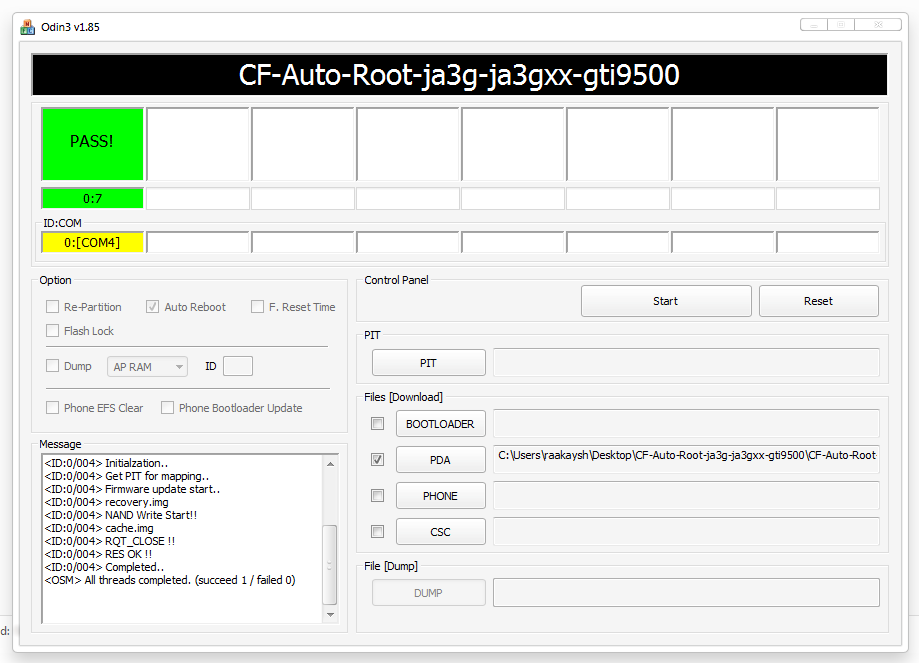
After completing (Step 4), Hit the Start button. The process should take hardly a minute after which your device will automatically boot into recovery and set the SuperSU binaries in place. You'll get a Big GREEN Pass on Odin. once your phone powers back normally, you will have root access.

HTC One M8 is the latest Flagship released by HTC and its rooting method HTC One M8 is already on the Web. The method is separate for both TWRP Recovery and Rooting HTC One M8, this is not an all in one Root toolkit of Auto-Root method. We are providing you the rooting tutorial of HTC One M8 thanks to XDA forums member mike, that has ported the latest TWRP from M7 and made a Flashable .zip file of Super SU apk and Binaries. How To Root and Install CWM Recovery On HTC One M8. Rooting will void your warranty and may brick your device.
Requirements

- Well Charged Battery 60%-80% is recommended.
- Back-Up all your important Contacts, Call Logs & Messages. It is highly recommended in case of any mishap or data loss to back up all your important data.
- Back-Up your Mobiles EFS Data.
- Check your device model, Go To Setting > About and Make sure that it is HTC One M8 (not M7).
- Do-not try it on HTC One M7.
- Bootloader Must Be Unlocked: Follow Unlock Bootloader Of HTC Smartphones.
- Make Sure Fastboot Is Configured: Download & Install Android Adb Fastboot Drivers on Your Windows PC.
- Enable USB Debugging Mode
- Download USB Driver For HTC Devices: Download Here
- Download TWRB Image HERE
- Download Super SU HERE (Android_Revolution_HD_Root_and_BusyBox.zip)
- Copy the TWRP Image in the Fastboot folder.
- Go To Phone Settings and Disable Fastboot in Power Options.
- Turn Off the Device.
- Turn off your phone and open HBOOT mode. How? Press and hold Volume Down + Power button until you see some text on Screen, Select Fastboot in the Menu.
- Connect your Device With PC.
- Now Open Command prompt in Fastboot Folder, How? Hold Shift Key and Right Click anywhere in the Fastboot folder .
- Type in the Following Command one after the Other:
- Your device will Now Reboot and TWRP Will be installed on your device.
- Copy the Super SU.zip files to the Root of your Device Sdcard.
- Turn Off your device.
- Turn off your phone and open HBOOT mode. Here's How: Press and hold "Volume Down + Power" button until you see some text on Screen, Select Recovery in the Menu.
- Tap On Install and Select the Super SU File and slide the button to start the process.
- Once done go back to TWRP Recovery and Reboot the Device.

This YouMobile Root Guide will show you How to Root your Samsung Galaxy S5 (SM-G900F) Step-by-Step with all the links/files you'll need during the process. Warning: This will void your warranty.
Step #1

First, you will need Chainfire's CF-AutoRoot, Download it HERE. This 21MB zip contains both CF-AutoRoot (Screenshot above), which we'll be showing you how to flash through Odin, and the Odin software itself. The CF-AutoRoot file will have a ".tar.md5" extension, and your resident archive software (WinRAR, 7Zip, etc) will likely let you extract the contents. Do not do that. Simply extract the contents of the first .zip and no more.
Step #2

Now you downloaded both the ".tar" file that you'll be flashing, and also Odin, which we will use to do the flashing. For the next step, you need to have your Galaxy S5 disconnected from your PC, so unplug the USB cable for now. Start Odin3-v3.0.7.exe. Click the PDA tab, and select the CF-Auto-Root-klte-kltexx-smg900f.tar file you extracted just before. A short confirmation will appear in the log box on the bottom left.
Step #3

Next up, you need to get your Samsung Galaxy S5 into "Download Mode". Easy stuff. Just turn off your smartphone completely, wait for a few seconds, and click Volume Down and the Power and Home buttons simultaneously. A few short seconds after, and you'll be greeted with the screen you see on your left. Press Volume Up to continue if asked.
Step #4

You now need to ensure that there's communication between Odin and your Galaxy S5. So plug in your S5 to a USB port on the computer, and the one of the smaller boxes on the top left should light up with the ID of the particular USB port you're using. See the screenshot on the left for reference.
If you do not have that, then drivers for your device are missing. Installing latest Samsung Kies is usually a good way to ensure conformity. You need to complete this step in order to continue.
Step #5

So, now the CF-AutoRoot .tar file is loaded in the PDA field, Odin recognizes your Galaxy S5 sitting in Download mode, and you're ready for action. Just make sure you haven't messed with any other option, especially Re-Partition, and you're good to go.
Just hit start next, and you'll see two things: the log box on the bottom left will start churning info, all the while the big rectangular field immediately above the ID:COM one will start flashing colors and showing text. Eventually, and if everything goes well, you should get a green big "PASS!". We're almost done!
Step #6

Once you get the coveted "PASS!" in Odin, your Galaxy S5 should reboot by itself. Your phone should then enter a special recovery with a red Android logo. You don't have to do anything, just wait out the procedure and your Galaxy S5 is Now Rooted (Evil Laugh)!
Note: If your phone does not reboot into recovery mode on its own and go through the above-mentioned red-Android-logo procedure, then you should just go through these steps again. If this persists, you should just enter recovery mode manually after flashing the .tar file through Odin. Just press Volume Up and the Home and Power buttons simultaneously, and the installation should continue automatically from thereon.

Our Mission is Keeping you updated with Latest Android News and Updates as it Happens!

© 2023 YouMobile Inc. All rights reserved