


![]()
If you own a Samsung Galaxy device, you probably have Battery life issues ? Right ? Most of the battery life problems is caused by Samsung's super AMOLED displays, as they are huge (5.0" - 6.0") with resolutions various from FHD to QHD which means more pixels to power and more brightness needed. The display consumes an average of 45% to 55% of your battery life. Don't worry we have a solution for you... Easy and Safe too!
To increase your battery life you will need to reduce the number of pixels on your screen by reducing the resolution of your screen. Placing black spots in a pattern over the screen will actually turn off the pixels in those locations (because in AMOLED tech black color is achieved by actually turning off the pixels on the display). So parts of your screen will be turned off. You'll do that using a simple App that does NOT require any Rooting at all.
Increase Battery Life by Following these Instructions:
1. Download Pixel Battery Saver
Download & Install the App from Google Play Store Here [FREE]
![]()
2. Choose level of effect
The app will apply a filter over your screen, placing black pixels in a pattern. You can choose the pattern's density as soon as you launch it.

3. Activating the filter
This is what happens when the app is doing its work. Note that the effect looks much less pronounced on the actual phone's screen.
4. Want battery saving only?
If you only wish to reduce your screen's sharpness when the battery is running low, tap on the "Booting" tab on the top right, then check "Start on specific battery level" and "And only then" (if you wish to not be able to turn the filter on manually), then use the slider below to set the battery threshold.

5. Permanent notification and quicktoggle
The app runs in persistent mode, so Android can't close it at random. Its notification will give you a quick on / off toggle, too, so that makes it useful
6. Toggle at will
And there you go - you are free to reduce the screen's sharpness at will and save some precious battery. Now combine this with Power Saving Mode for some extreme longevity!


Samsung's two latest Android flagships, Galaxy S6 and Galaxy S6 Edge will be launching on many regions very soon (early April). The Galaxy S6 and S6 edge have a beautiful screen on their side, with lots of new customization options coming via ways of themes that change the icons, wallpapers, font, and the overall appearance of the phone. Which makes you want to share your beautiful home screen with everyone online... you probably wondering how to take screenshots on these two phones, here's the tutorial.
How do you take a screenshot on the Galaxy S6 and S6 Edge ?

It's all very simple: just simultaneously press the big round home key up front and the power/lock key on the side. You'll hear a short click, and then a zippy animation will show the screengrab flying off the display. The screenshot will then appear in your notification dropdown and it will be automatically saved into the gallery app where you can see it, edit it, and share it.

Li-ion Batteries are indeed the most crucial hardware components, every Smartphone has one, and it is always NOT enough for the user's needs. Taking a good care of your battery is a very important matter as its capacity wears by time which affects other parts of your device.
In this tutorial here, we will provide you this Technical Smart Tips to improve your Battery's lifetime and improves its performance along a normal day usage.

How to Care for your Smartphone's battery the correct way:
1. Several partial charges are better than a full one
Well, just like in real life, several sprint sessions are better than a marathon. Lithium-ion batteries appreciate partial charging, for example from 30% to 60% or from 45% to 79%, as this keeps the battery's cells close to their ideal state for longer. This means that you have no excuse not to charge your phone several times a day if you can do so.
2. Avoid complete discharges
Okay, extremities are bad for your battery's health. Leaving it at maximum voltage for a long period of time is bad, but draining it all the way down to 0% is even worse. While modern batteries can't fully discharge (whatever you do, there's still a small amount of electricity that will remain unavailable to your phone's hungriness), hitting the rock bottom of your juicer means that some of the battery's cells will no longer be able to hold charge. And this is pretty bad.
3. Your phone's battery feels best at ~40%
There's a reason why the batteries of most phones come pre-charged between 40% and 50% - this is the ideal state of a battery as the voltage is neither too high, nor too low. First of all, this exact charge level does not stress the battery's cells, yet it still allows it to slowly discharge itself while waiting for the impatient user to provide a steady flow of electrical current.
4. Avoid high temperatures
High temperatures are bad for your battery. Your battery can lose up to 80% of its overall capacity if you store it at temperatures of 140F (60C) in a year, though we doubt that anyone will do so. At 77F (or 25C), your phone will lose less than 20% of its maximum capacity for one year.
5. Low temperatures are a no-no as well
If you need to store a battery (due to reasons unknown), make sure that you don't subject it to extremely low temperatures, as freezing deteriorates cells' ability to hold charge, similar to the way heat affects them.
6. Leaving your battery depleted for a long time will render it useless
Normally, your lithium-ion battery will be depleted if the voltage level falls down to roughly 3.0V/cell. If, however, the voltage inside the battery falls below 2.7V/cell, the battery's protective circuits will put into the so-called "sleep" mode, making it nonchargeable naturally, that's the worst case scenario. That's why it's advisable to always make sure that the battery is charged to some extent ideally,that'd be around 40%, as we already mentioned.
7. Lithium-ion batteries have a shelf life
Simply put, you shouldn't stock up on lithium-ion batteries regardless whether you use them or not, they slowly degrade over time and their maximum capacity deteriorate. Instead, buy a new battery immediately before you put it inside your device.

In this tutorial we will show you hot to Root your Moto Nexus 6 with a 1-Click tool kit. Simple steps that are easy to do and not too much files to download. Check the Requirements first, then follow the Steps below it. NOTE: Rooting will void your warranty and may brick your device, root at your own risk.
The most simplified and user-friendly way to root your Nexus 6 is using the Nexus Root Toolkit, developed by XDA's WugFresh, which is compatible with a wide range of Nexus devices, including the more popular Nexus 5, 6, and 9. It's a simple Windows program that allows you to do several things.
Toolkit Root Tutorial:
Step 1. Enable developer options menu on your Nexus 6: Settings > Tap your Build 7 times (then configure drivers if you haven't already with the driver guide)
Step 2. Open developer options: Settings > Developer Options
Step 3. Enable USB Debugging, and "enable oem unlock"

Step 4. In Nexus Root Toolkit on your PC, select the correct device and build (what you are currently running)
Step 5. Configure your drivers if you haven't already using the driver guide
Step 6. If you need to, backup your important data.
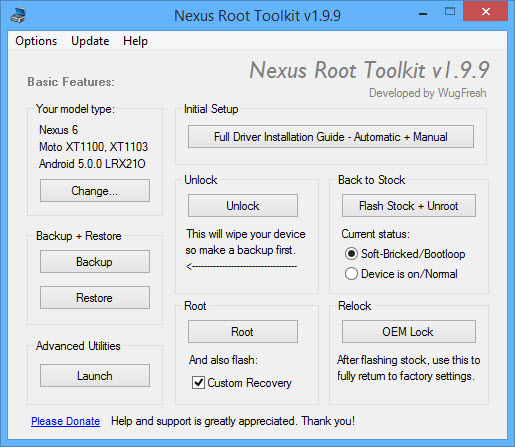
Step 7. Unlock your device (if needed)
Step 8. Root your device
Step 9. Done! your Nexus 6 is now Rooted...


In order to Improve multi-tasking on smartphones even more, Google Chrome 39 on Android 5.0 Lollipop is adding a new feature merging browser tabs with recent tasks, so you can switch between tabs using the system-wide App switcher.
If you don't want this feature, Here's How to Get Tabs Back In Chrome for Lollipop:
Step 1
On any Chrome window, tap the 3 dots in the upper-right:

Step 2
Tap "Settings" (you may have to scroll down):

Step 3
Tap "Merge tabs and apps":

Step 4
Tap the toggle in the upper-right to the off position:

Step 5
Hit "OK" in the dialog window that pops up, and Chrome will restart:

Chrome will now use tabs like it did before, and each tab will not show up as a separate task in the Android app switcher.

Our Mission is Keeping you updated with Latest Android News and Updates as it Happens!

© 2023 YouMobile Inc. All rights reserved